
Mapping Projects
HMAS Swan III
The HMAS Swan map was one of our more ambitious projects. Since first diving the Swan back in 2006, it has always been one of our favourite and most visited purpose sunk wrecks. With its close location to the Old Dunsborough Boat Ramp, ease of access, depth and the size of the wreck it always had a constant draw on us to scratch that deeper wreck itch.
The very first of the prepared wrecks to be sunk in 1997 the HMAS Swan was heavily stripped in preparation for safe access to divers, but stripped to the point most of the wreck was indistinguishable internally and presented as almost just a shell of its former self as a warship. After years of diving the wreck going from level to level, room to room soon the attraction of the large site changed to the curiosity of where and what function certain areas of the warship once were. In 2015 I first toyed with the idea of a descriptive map of the wreck only really to benefit my own curiosity, never really thinking it would come to an end.

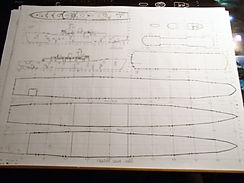
Faced with some time on my hands and the need to focus my diving on something new, I started getting serious about the project in December 2015.The best way I could think of for accurately getting the internal structure of the wreck on paper was to work from the outside in. The outside profile of the wreck was the first step, getting the entry points accurately positioned in their correct locations, then mapping the internal rooms in relation to the entry points. Firstly, to create an outside profile of the wreck to the correct dimensions, I was able to purchase external plans from the Royal Naval Historical Society that sell external measurements for model ship builders. The HMAS Swan III was originally built in Australia to the plans for the British Leander Class Frigate in the type 12 variant. Having the plans to scale I was able to transfer the dimensions for the warship directly onto graph paper to maintain the proportions of the wreck and increase the size of the map. Pre-dive the plans were transferred to slate and draft entry points drawn in from other mud maps floating around the net and also images of the wreck prior to its sinking. The next step was four dives on the wreck correcting the positioning of entry points, recording any excluded entries and drawing and filming their location in relation to features on the wreck. Knowing the external features were in exact scale we were able to confidently record each entry with its corrected position in relation to other entries and in its correct location. One of the greatest hurdles was the entries of both the port side and starboard side not mirroring each other, the confusing and chaotic entries on the Bridge Deck and the constant ascending and descending at depth to align the hull entry points to scaled referenced locations on the ship's main deck.
With the vertical hull profiles drawn and to scale and with the entries points accurately in place, the next process was to record the internal rooms and segments of the wreck. This took another eight dives over three trips to Bussleton throughout January and February 2016. The dives involved systematically swimming each deck from front to back, filming every little corner of the wreck. We recorded each room thoroughly with video that was to be used for filling out the vertical profile when returning to Perth. This totalled about 14 hours of recording when combined with older dive footage and images of the internals of the wreck. The internal rooms are only scaled by eye but were later confirmed when we were able to get copies of the actual Damage Control Board from the HMAS Swan. The rooms and internals were filled out over many late nights and sore eyes reviewing footage and constantly checking and rechecking, If you were to go over the dimensions of the rooms with a measuring tape they wouldn't be overly accurate to the metre but, with the correct positions of the entry points being the accurate references for the rooms, entries are usually only every fifteen metres or so, one being visible from almost every room, everything came together very confidently and easily due to the wreck being a very straight forward layout on the British designed destroyer. The hardest and probably most challenging section was the food stores and cool rooms on the 2nd deck, we originally made a mistake in this section but it was corrected before the map went to print.


After I had the entire layout down on paper, I still faced the problem of identifying the areas, rooms and compartments of the warship. We hit a road block for a few weeks while we tried to get the interest of any ex crew member that could help with the identification. Luckily a few weeks went by and we hit the jackpot from Shad O'Beirne who served on the Swan and when the warship was decommissioned he acquired a Damage Control Board that was now hanging up on his wall in Dunsborough. Unable to meet in person Shad was more than happy to send us images of the DC board and in return we offered liquid compensation or a donation to the Legacy Foundation (Legacy assists the families of returned ex service man and women of the Australian Defence Force) the latter being Shads preferred choice and it was made on behalf of all the ex serving crew members of the HMAS Swan III.
The DC boards were a godsend and were far more helpful then just a verbal description of the wreck. It allowed us to accurately check and correct the internal scale of the rooms that had been drawn by eye. It also helped to identify our error in the coolroom section of the 2nd deck and helped us to correct some scale throughout the 2nd and 3rd deck in the crew areas and magazine rooms forward of the engine room. On top of all this we had accurate descriptions from the plans of the ship to identify rooms of interest, something that had been done so vaguely on other mudmaps of the wreck. In hindsight having the DC boards on hand before the project would have been extremely handy but it probably would have had a negative effect on our desire for detail in recording the wreck through the diving phase, which in the end was so necessary for identifying the vertical ascending/descending entry points throughout the levels and also recording of the walls internally. Many of the walls on the DC board had been removed prior to sinking or had partially broken down in the last 20 years. All these details were important to include on the poster if it was to be valuable to a diver wishing to plan a dive on the wreck.


Through the encouragement of diving friends and Jacqui it was decided that all that effort would be wasted just to sit on my hard drive. A poster was created in Photoshop incorporating the map with some of our images and some basic info on the Swan. This creation, coupled with an interest to get our Facebook page turned into a website saw us put the the poster to print and put it out there to divers to purchase. With a small profit made, it was not to benefit ourselves but covered the cost of the print, the legacy donation and create an amount to go directly into funding the cost of this website that has been over a year to get off the ground.
In the end I'm really proud to have pulled off the map, we're a bit dived out on the Swan now and haven't been back since Feb 2016 but we always welcome feedback from anyone using it as a reference on the wreck. Copies went out to many divers, and quite a few instructors for local dive shops. With a great showing from Perth Scuba, the BSAC Perth club and a few ex serving members of the Swan. It is really humbling for it to have been so well received and hopefully the purchasers will be glad to know they not only contributed to the creation of this page but also unbeknown to them at the time also contributing towards the donation to the families of our ex service men and women of our country.
Hopefully soon, we'll go for another print in the coming months.
FV Lena
Currently in progress, we put the Lena map on hold while we work towards getting this website off the ground. We have the map drawn, digitised and will eventually wrap up editing it into a poster format which we'll get out to divers as soon as we can.


Although still 55 metres long, the Lena was a much easier wreck to get down on paper than the HMAS Swan but it did present a few problems. Mapped in January 2017 over only four dives, the levels of the wreck were mapped in much the same way as the Swan through thorough video recording. An external survey accurately positioned entry points using deck and reference points to accurately position the entries. This was helped with a pre-dive draft map where we used video footage of the wreck before scuttling that showed a 360° profile of the Lena and its entry points. This meant the first dive we needed to accurately confirm the entries and re-position from parallax error with the video perspective, then include the eight blown out blasted entry points beneath the waterline that were opened on detonation and not visible in the video.
The main problem we faced with the Lena was the lack of dimensions or measurements seeing that there were no plans available through any source. This meant the second dive was spent with lines being used to measure the wreck's dimensions using a 35metre spool with accurately marked 1 metre increments. Points were measured at eight cross sections across the beam of the ship, fore and aft measurements were taken from the wheelhouse to the bow, bow to the foredeck, wheelhouse to the funnel and wheelhouse to the stern. Deck heights and depths were recorded by depth gauge and may give a small inaccuracy however not detrimental to the profile of the ship.
Mapping the internal profile of the wreck was very simple with the large open compartments of the Lena, with only one deck fully enclosed from bow to stern, that being the hold and engine room deck. The only other enclosed areas were the living areas and processing rooms aft of the wheelhouse. One other thing that initially threw us off our draft was the collapsed sections of the wreck that had deteriorated since the vessels scuttling. The top deck aft of the funnel is now a fully open exposed deck since the roof has collapsed, with the same case for the working deck forward of the wheelhouse now being fully open to the elements. This area was a bit of a concern when we dived the Lena in swell in 2016. Although already partially collapsed, large sections of deck were rising and falling, flexing in the surge. In 2017 this flexing section had luckily collapsed probably through the previous winter swells further exposing the working deck.


When things slow down a bit for us in the coming months, we'll finish off the Lena map and work out just what we'll do to get it out there.
The Coombe and the River Wrecks
Originally I started drawing the river wrecks to get a better portrayal of diving each wreck. Always diving in poor visibility and green water, sharing average images from the river on the Facebook page never gave a good representation of the size or attraction of what are really interesting shore dive wrecks off Perth. After completing the Coombe larger wrecks and the Blackwall Reach Barge, the pole trails were starting to take form in the Swan River. When diving in the river with my good friend Darren Bedford who was active with the Swan Divers group, we decided we'd stick it all together and map the Coombe Wrecks Pole Trail that had just been completed in order to promote the site and open it up further to attract an interest to diving the Swan River.
The Coombe wrecks were completed over two visits, the task mainly involved a lot of recording from the surface getting GPS positions for the surrounding moorings and confirming the marks we already had for the wrecks. Given the amount of underwater content we already had for the deep wrecks, diving was only to tie up some lose ends, get some bearings and neaten some of the trail. We also removed a small confusing trail that lead from the Deep Barge to mooring 352 that usually caused a wrong turn due to its vicinity to the trail leading to the 19 metre boat.
The mapping part of the project involved plotting the recorded GPS positions of every mooring and wreck in the area into a mapping program. I then created a number of marks that were measured to create a metric scale to impose over the top of the nautical map. A second scaled map with a metric grid was drawn to match the digital map and copied across to paper with the marks and features drawn in, the drawn map was then digitised and worked on in Photoshop with the info added. Distances were brought across from the digital map. The depths were all recorded with the echo sounder at the point of each mooring and wreck and then we used the tide chart converted to lowest astronomical tide heights. depths were recorded while collecting GPS positions.
The individual drawings of the river wrecks are from swim patterns filmed across the sites, much more detail is taken and recorded than the ocean wrecks given that the river wrecks are smaller and less involved. A grid is strung up over each wreck to give reference and scale to the video and the wreck is drawn to a grid on paper with actual dimensions measured recorded from the dive.


The Key Biscayne
The most recent drawing that has been completed, in February we were able to get out to dive the Key Biscayne and get the last few bits of footage to complete a full recording around the perimeter of the barge platform. Using video from the last 6 years and around 14 dives on the Key Biscayne we were able to put together what we think is a pretty accurate drawing of the wrecksite. The dimensions of the barge platform from the ATSB sinking report allowed us to get a scale for the site on graph paper, the surrounding debris is drawn by eye around the platform while reviewing video and images of our dives covering the entire site. Orientation of the platform and legs was from bearings taken during dives.
Although similar to other site plans on the web, all show variations in the orientation, the condition of the platform or varying arrangements for the legs. We wanted to capture the legs in their correct positions, try and put the picture in a 3D perspective to give a better portrayal and show the deterioration of the south western edge of the platform where there is access for penetration.

Other mudmaps floating around
Unlike the detail of the river wrecks, these wrecks are really just drawn as mudmaps with no great attention drawn to scale. Most are recorded from swim patterns over the wrecks with bearings taken, sometimes a reference line is strung across the site to maintain a straight swim pattern. GPS positions are included to create a reference and sites drawn free hand while reviewing the footage. Usually they're drawn just to give a representation of the sites as a whole and give a rough guide to how to plan a dive or identifying points of interest.


